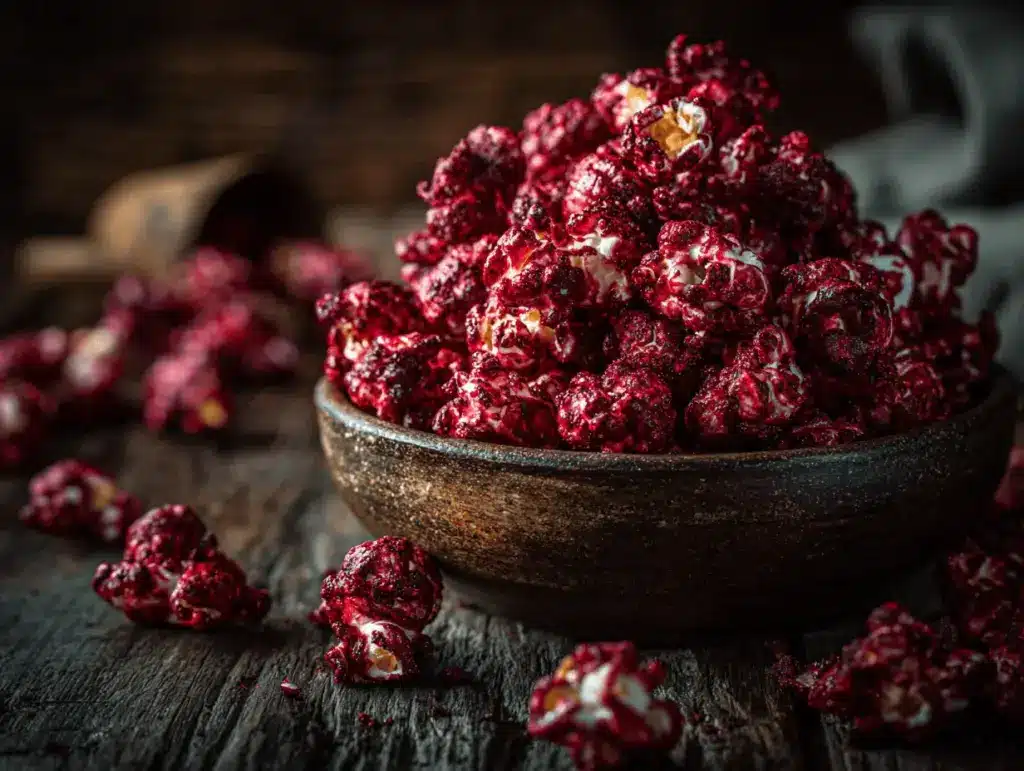
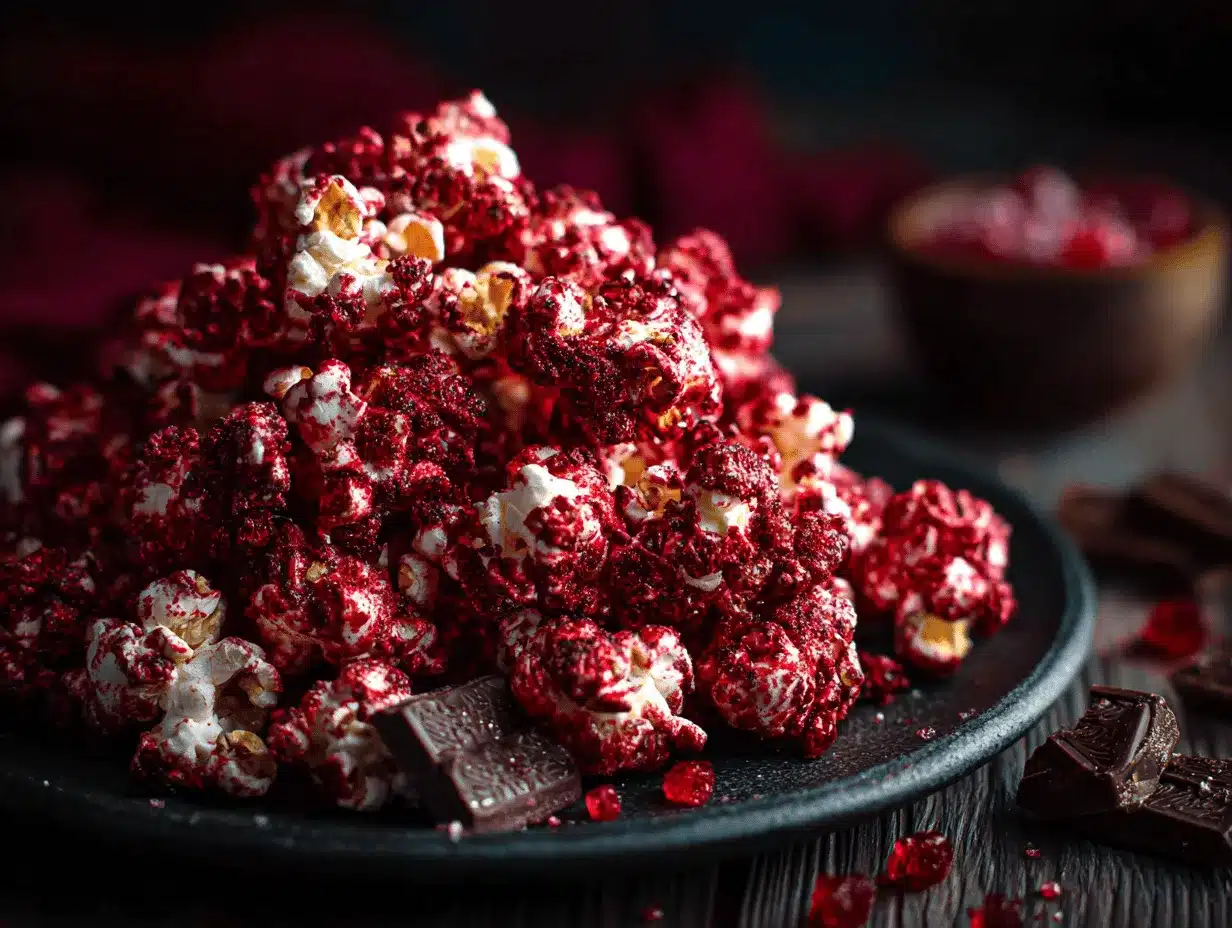
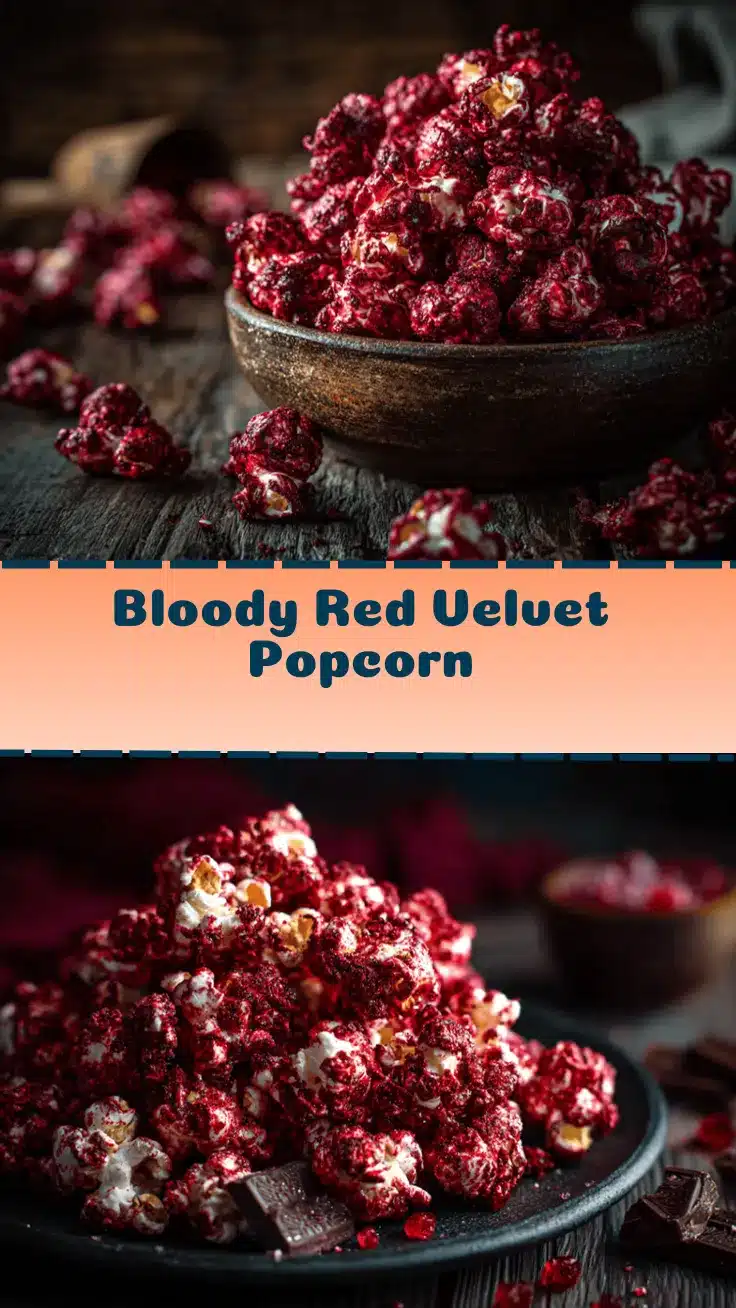
You know that moment when you’re craving something sweet but also a little bit outrageous? That was me last Halloween, staring at my pantry, wondering what snack could wow my friends and satisfy my constant need for anything red velvet. Suddenly, the idea for Bloody Red Velvet Popcorn popped into my head—no pun intended! The vibrant crimson color, a hint of cocoa, and crunchy popcorn all tangled up in a treat that’s as bold as it is addictive. Honestly, my kitchen looked like a scene straight out of a baking thriller—red velvet splatters, melted chocolate everywhere, and a wafting smell that just made me grin. If you’re looking for a party treat that’s both eye-catching and incredibly tasty, this red velvet popcorn recipe is a game-changer. It’s perfect for movie nights, themed parties, or when you just want to shake up your regular popcorn routine. And let’s face it, who doesn’t want to bite into something that looks this dramatic? After testing (and taste-testing) this recipe more times than I’ll admit, I can promise you it’s easy, fun, and sure to spark conversation at any gathering. Whether you’re celebrating a holiday, hosting a kids’ party, or just want a late-night snack that feels a little extra, Bloody Red Velvet Popcorn is here to steal the show.
Why You’ll Love This Recipe
I didn’t just whip this up on a whim—after several batches and more than a handful of flavor tweaks, I’m convinced this is the best red velvet popcorn recipe out there. Here’s why you’ll keep coming back for more:
- Quick & Easy: This recipe comes together in under 30 minutes. Perfect for spontaneous cravings or last-minute party prep.
- Simple Ingredients: No specialty store runs required. Everything you need is probably already in your kitchen.
- Perfect for Parties: The bold red color and sweet crunch make this popcorn ideal for birthdays, movie nights, Halloween, or Valentine’s Day.
- Crowd-Pleaser: Kids love the color, adults love the flavor—it’s a win-win. I’ve never seen leftovers!
- Unbelievably Delicious: The combo of cocoa, vanilla, and a hint of cream cheese flavor takes regular popcorn to a whole new level.
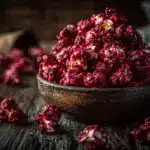
But what really sets this recipe apart is the texture—each kernel gets coated in glossy red velvet goodness, then drizzled with creamy white chocolate (hello, dramatic effect!). I’ve tried other versions, but none nail that classic red velvet taste without making the popcorn soggy or clumpy. My secret? Baking the coated popcorn in a pan for just a few minutes to lock in crunch and color. Whether you’re an experienced baker or a popcorn newbie, you’ll find this recipe forgiving, impressive, and totally irresistible. It’s comfort food with attitude, and if you’re anything like me, you’ll love how it turns a simple snack into something unforgettable. Don’t be surprised if your guests beg for the recipe—or for seconds!
Ingredients Needed
This irresistible popcorn recipe uses basic pantry ingredients with a few fun twists for that classic red velvet flavor and bold party presentation. Here’s what you’ll need:
- For the popcorn:
- 8 cups (about 75g) plain popped popcorn (air-popped or stove-top, unsalted)
- 2 tablespoons (28g) unsalted butter, melted (for extra richness)
- For the red velvet coating:
- 1/2 cup (100g) granulated sugar
- 1/4 cup (30g) unsweetened cocoa powder (Dutch-process for deeper color and flavor)
- 1/4 cup (60ml) whole milk (or use almond milk for dairy-free)
- 1/3 cup (80g) cream cheese, softened (room temperature for smooth mixing)
- 1 tablespoon (15ml) vanilla extract (I like Nielsen-Massey for a bold vanilla kick)
- 1 tablespoon (15ml) red food coloring (gel type delivers the brightest color)
- 1/4 teaspoon salt
- For the “bloody” drizzle:
- 1/2 cup (90g) white chocolate chips (or candy melts for easier melting)
- 1 teaspoon (5ml) coconut oil (optional, helps thin the chocolate for drizzling)
- Extra red food coloring (for dramatic effect, a few drops do the trick)
- Optional add-ins:
- Crushed freeze-dried raspberries (for tartness and color pop)
- Mini marshmallows (for fluffier bites)
- Red velvet cake crumbs (for extra authenticity—if you have leftovers!)
Ingredient Notes & Substitutions:
– Use dairy-free cream cheese and almond milk for a vegan version.
– If you only have microwave popcorn, go for plain and unsalted—flavored varieties can clash.
– No white chocolate? Try yogurt chips or skip the drizzle for a lighter treat.
– For natural coloring, beet powder works, but the shade is less intense.
– I’ve used both Hershey’s and Ghirardelli cocoa powder; both work well, but Dutch-process gives a richer red velvet flavor.
Honestly, don’t worry if you’re missing an add-in or two—this recipe is flexible and forgiving. The main thing? Make sure your popcorn is fresh and your food coloring is vibrant for maximum visual impact.
Equipment Needed
- Large mixing bowl (for tossing popcorn and coating)
- Baking pan or sheet pan (lined with parchment for easy cleanup)
- Small saucepan (for melting butter and mixing red velvet coating)
- Whisk or hand mixer (I prefer a hand mixer for ultra-smooth cream cheese blending)
- Spatula or wooden spoon (for gentle mixing—don’t crush the kernels!)
- Measuring cups and spoons (accuracy helps nail the flavor)
- Microwave-safe bowl (for melting white chocolate chips)
- Parchment paper or silicone baking mat (to prevent sticking)
If you don’t own a hand mixer, a strong whisk works—just expect a mini arm workout. For the baking pan, a rimmed cookie sheet is ideal, but I’ve used a glass casserole dish in a pinch (just lower the oven temp by 10°F to avoid burning). Silicone mats make cleanup a breeze, but parchment paper is a budget-friendly substitute. Pro tip: Wipe your mixing bowl with a little oil before tossing in the popcorn to prevent sticking and clumping. And if your microwave is finicky, melt the chocolate over a double boiler—it’s slower but foolproof.
Preparation Method
- Pop the popcorn: Pop 8 cups (about 75g) of popcorn using your preferred method. Air-popped is lightest, but stovetop popcorn works too. Let it cool completely and transfer to a large mixing bowl. (If using microwave popcorn, double-check for unpopped kernels!)
- Make the red velvet coating: In a small saucepan, melt 2 tablespoons (28g) unsalted butter over low heat. Add 1/2 cup (100g) granulated sugar, 1/4 cup (30g) cocoa powder, 1/4 cup (60ml) milk, and 1/4 teaspoon salt. Whisk until smooth, then remove from heat.
- Blend in cream cheese and vanilla: Add 1/3 cup (80g) softened cream cheese and 1 tablespoon (15ml) vanilla extract to the saucepan. Whisk (or use a hand mixer) until completely smooth and creamy. Stir in 1 tablespoon (15ml) red food coloring, mixing until the color is evenly distributed. The mixture should be glossy and deep red. (If it’s too thick, add an extra splash of milk.)
- Coat the popcorn: Pour the red velvet mixture over the cooled popcorn in the large bowl. Use a spatula or wooden spoon to gently toss until every kernel is coated. (It might look a little messy—don’t worry, that’s normal!) Make sure to scrape the bottom of the bowl to get all the kernels covered.
- Spread and bake: Preheat your oven to 250°F (120°C). Line a baking pan with parchment paper or a silicone mat. Spread the coated popcorn in an even layer across the pan, breaking up large clumps. Bake for 15 minutes, stirring halfway through, until the coating is set and the popcorn is dry to the touch. (Watch closely—if you smell burning cocoa, pull it out early!)
- Make the “bloody” drizzle: While the popcorn bakes, melt 1/2 cup (90g) white chocolate chips with 1 teaspoon (5ml) coconut oil in a microwave-safe bowl. Heat in 20-second intervals, stirring each time, until smooth. Add a few drops of red food coloring for a dramatic “bloody” look. (If the chocolate seizes, add a touch more oil and stir vigorously.)
- Drizzle and cool: Remove the popcorn from the oven and let it cool for 5 minutes. Drizzle the red-tinted white chocolate over the popcorn using a spoon or piping bag. Add crushed freeze-dried raspberries or mini marshmallows if desired. Let the popcorn cool completely before breaking into pieces.
- Serve or store: Once dry, break the popcorn into clusters and pile into bowls or party bags. If you’re not serving right away, store in an airtight container at room temperature for up to 3 days.
Preparation Notes: If your popcorn clumps together, don’t sweat it—just break it up after baking. The coating may look thick at first, but it crisps up as it cools. For a deeper red, add extra food coloring before baking. And if you’re making this with kids, expect sticky fingers and lots of giggles!
Cooking Tips & Techniques
Let’s be real—red velvet popcorn can get messy, but that’s half the fun. Here’s what I’ve learned after a few kitchen mishaps and popcorn disasters:
- Don’t rush the coating: If the red velvet mixture is too hot, it’ll make your popcorn soggy. Let it cool for a minute before pouring over the kernels.
- Even mixing is key: Use a big bowl and toss gently so every kernel gets coated without crushing the popcorn.
- Keep an eye on the oven: Overbaking dries out the popcorn and can scorch the cocoa. Stir halfway and check for doneness by touch—should be crisp, not sticky.
- White chocolate drizzle: If your drizzle is too thick, microwave for a few more seconds or add a tiny bit of coconut oil. I learned the hard way—chunky drizzle isn’t pretty!
- Work quickly: Once you drizzle the chocolate, add your toppings fast. The chocolate sets in minutes, so have everything ready to go.
- Batch prep: For big parties, make two pans at a time. Just swap pan positions halfway through baking for even results.
- Troubleshooting: If your popcorn turns out chewy, it likely needed more time in the oven. Pop it back in for 5-minute bursts until it’s crisp.
I’ve burned a batch, under-mixed another, and even tried to rush the cooling—never again! Take your time and trust the process. Your patience will pay off with perfectly crunchy, vibrant popcorn every time.
Variations & Adaptations
- Gluten-Free: Use gluten-free popcorn (many brands are naturally gluten-free) and check your food coloring and chocolate for hidden gluten.
- Vegan: Swap cream cheese for a dairy-free alternative, use almond or oat milk, and choose vegan white chocolate chips.
- Spicy Red Velvet: Add 1/2 teaspoon cayenne pepper to the coating for a fiery kick—great for adult parties!
- Seasonal Twist: For Christmas, add crushed peppermint candies and green sprinkles. For Valentine’s Day, toss in heart-shaped candies.
- Nutty Crunch: Mix in toasted chopped pecans or walnuts before baking for a richer bite.
- Air Fryer Option: Instead of baking, crisp the popcorn in batches using your air fryer at 250°F (120°C) for 8 minutes, shaking halfway. It keeps the crunch without heating up the whole kitchen.
I once made a batch with raspberry extract instead of vanilla—totally delicious and extra fruity. Feel free to experiment with flavors and toppings. If you have allergies, skip nuts and use sunflower seeds or extra marshmallows. This recipe’s real beauty is how easily you can tweak it for any crowd or occasion.
Serving & Storage Suggestions
Serve Bloody Red Velvet Popcorn at room temperature in big bowls, individual party cups, or gift bags tied with a ribbon for a festive touch. For Instagram-worthy presentation, pile it high and sprinkle on extra “bloody” drizzle—makes it pop in photos! Pair with cold milk or hot cocoa for movie nights, or alongside cheese platters and finger foods for a party spread. This popcorn is a hit with sweet dessert wines or fruity punch, too.
To store, let the popcorn cool completely, then transfer to an airtight container. It stays crunchy for up to 3 days at room temperature. For longer storage, freeze in zip-top bags and thaw at room temp—though honestly, it’s rarely around long enough to need freezing! To reheat and restore crunch, pop the popcorn in a 250°F (120°C) oven for 5 minutes. The flavors deepen after a day, so leftovers taste even better. Just keep the popcorn away from humid environments—moisture is the enemy of crunch!
Nutritional Information & Benefits
Each serving (about 1 cup, 25g) of Bloody Red Velvet Popcorn delivers approximately:
| Calories | 110 |
|---|---|
| Fat | 4g |
| Carbs | 17g |
| Protein | 2g |
| Sugar | 9g |
Health Benefits: Popcorn is a whole grain, naturally high in fiber and antioxidants. This recipe uses real cocoa and cream cheese for flavor—no artificial cake mixes. You can opt for air-popped popcorn and low-fat cream cheese for a lighter snack. It’s gluten-free and can be made vegan or nut-free with simple swaps. Allergen note: Contains dairy and may contain traces of nuts if you add them. If you’re watching sugar, use a sugar alternative like monk fruit sweetener. Personally, I love how this treat feels indulgent but still gives you a little whole grain goodness. Just remember: moderation is key!
Conclusion
If you’re after a show-stopping party treat that’s all about bold flavor, eye-catching color, and simple prep, Bloody Red Velvet Popcorn is the answer. You can customize it for any celebration, tweak it for dietary needs, or just make a batch for a cozy night in. I’ve loved watching friends’ faces light up when they see (and taste) this popcorn—it’s the kind of recipe that turns snacking into an event. Try it once, and you’ll see why I keep making it again and again. Don’t forget to leave a comment with your own twists or share your popcorn pics—nothing makes me happier than seeing your creations! You deserve snacks that stand out, so go forth and bake boldly.
Frequently Asked Questions
How do I keep red velvet popcorn from getting soggy?
Make sure to bake the coated popcorn at a low temperature until it’s dry to the touch. Stir halfway through baking, and let it cool completely before storing.
Can I use microwave popcorn for this recipe?
Yes! Just choose plain, unsalted popcorn so the flavors don’t clash. Avoid heavily buttered varieties.
Is red velvet popcorn gluten-free?
Popcorn is naturally gluten-free, and all ingredients in this recipe can be gluten-free. Double-check your toppings and food coloring labels to be sure.
Can I make red velvet popcorn ahead of time?
Absolutely! Store in an airtight container for up to 3 days. The flavor actually gets better as the popcorn sits.
What’s the best way to get the vibrant red color?
Gel-based food coloring gives the boldest color. Add more drops if you want it even brighter—just mix well to avoid streaks.
Pin This Recipe!
Red Velvet Popcorn Recipe: Easy Homemade Party Treat Idea
- Total Time: 25 minutes
- Yield: 8 servings 1x
Description
This vibrant, sweet, and crunchy red velvet popcorn is a show-stopping party treat with a classic cocoa-vanilla flavor and dramatic red color. Perfect for movie nights, themed parties, or whenever you want to shake up your popcorn routine.
Ingredients
- 8 cups (about 75g) plain popped popcorn (air-popped or stove-top, unsalted)
- 2 tablespoons (28g) unsalted butter, melted
- 1/2 cup (100g) granulated sugar
- 1/4 cup (30g) unsweetened cocoa powder (Dutch-process preferred)
- 1/4 cup (60ml) whole milk (or almond milk for dairy-free)
- 1/3 cup (80g) cream cheese, softened
- 1 tablespoon (15ml) vanilla extract
- 1 tablespoon (15ml) red food coloring (gel type)
- 1/4 teaspoon salt
- 1/2 cup (90g) white chocolate chips (or candy melts)
- 1 teaspoon (5ml) coconut oil (optional)
- Extra red food coloring (for drizzle)
- Crushed freeze-dried raspberries (optional)
- Mini marshmallows (optional)
- Red velvet cake crumbs (optional)
Instructions
- Pop 8 cups of popcorn using your preferred method (air-popped or stovetop). Let cool completely and transfer to a large mixing bowl.
- In a small saucepan, melt unsalted butter over low heat. Add granulated sugar, cocoa powder, milk, and salt. Whisk until smooth, then remove from heat.
- Add softened cream cheese and vanilla extract to the saucepan. Whisk or use a hand mixer until smooth and creamy. Stir in red food coloring until evenly distributed. If too thick, add a splash of milk.
- Pour the red velvet mixture over the cooled popcorn. Use a spatula or wooden spoon to gently toss until every kernel is coated.
- Preheat oven to 250°F (120°C). Line a baking pan with parchment paper or silicone mat. Spread coated popcorn in an even layer, breaking up large clumps.
- Bake for 15 minutes, stirring halfway through, until coating is set and popcorn is dry to the touch. Remove from oven and let cool for 5 minutes.
- While popcorn bakes, melt white chocolate chips with coconut oil in a microwave-safe bowl. Heat in 20-second intervals, stirring each time, until smooth. Add a few drops of red food coloring for dramatic effect.
- Drizzle red-tinted white chocolate over cooled popcorn using a spoon or piping bag. Add crushed freeze-dried raspberries or mini marshmallows if desired.
- Let popcorn cool completely before breaking into pieces. Serve in bowls or party bags, or store in an airtight container at room temperature for up to 3 days.
Notes
For vegan or gluten-free adaptations, use dairy-free cream cheese, almond milk, and vegan white chocolate chips. Beet powder can be used for natural coloring, though the shade will be less intense. If popcorn clumps together, break it up after baking. For extra crunch, bake a few minutes longer, but watch closely to avoid burning. Store in an airtight container for up to 3 days. For big parties, make two pans at a time and swap pan positions halfway through baking.
- Prep Time: 10 minutes
- Cook Time: 15 minutes
- Category: Snack
- Cuisine: American
Nutrition
- Serving Size: 1 cup (about 25g)
- Calories: 110
- Sugar: 9
- Fat: 4
- Carbohydrates: 17
- Protein: 2
Keywords: red velvet popcorn, party snack, homemade popcorn, dessert popcorn, movie night treat, easy popcorn recipe, Halloween snack, Valentine’s Day treat