The first time I smelled apple cobbler baking in my kitchen, I swear my entire house felt warmer. There’s something about the aroma of bubbling apples, brown sugar, and cinnamon that just wraps you up and refuses to let go. Honestly, I stumbled upon this apple cobbler recipe during a chilly autumn weekend, when I had more apples than sense and no patience for pie crust. You know how it goes—sometimes all you want is that gooey, comforting dessert without the fuss.
Apple cobbler has quickly become my go-to fall baking dessert, and not just because it’s ridiculously easy. It’s got that perfect balance of sweet apples and buttery topping, with a texture that’s somewhere between cake and biscuit—absolute magic! I’ve tested this recipe a dozen times (no exaggeration), tweaking spices and experimenting with different apple varieties until it was just right. My kids ask for it every apple season, and I can’t even pretend to resist.
Why do I love this apple cobbler recipe so much? Well, for starters, it’s a breeze to whip up, even on busy weeknights. Plus, it’s a crowd-pleaser—great for gatherings or lazy Sundays when you need a little extra comfort. If you’re looking for the perfect homemade fall dessert, this is it. No fancy techniques, just honest, nostalgic flavor. And let’s face it, nothing beats the combo of juicy apples and a golden, crumbly topping. If you’re ready to fill your kitchen with the ultimate autumn scent, stick around. This apple cobbler recipe is about to become your new favorite!
Why You’ll Love This Recipe
- Quick & Easy: Comes together in under an hour, so you can satisfy those sweet cravings without spending all day in the kitchen.
- Simple Ingredients: No need for a fancy grocery list—you probably have everything you need already. Apples, flour, sugar, butter, and a sprinkle of cinnamon are the stars here.
- Perfect for Any Occasion: Whether you’re hosting a cozy fall dinner, potluck, or just want dessert after a weeknight meal, this apple cobbler fits right in. It’s even better for holiday mornings or spontaneous baking sessions.
- Crowd-Pleaser: Kids and adults both go nuts for this dessert. It’s the kind that disappears fast, with everyone asking for seconds.
- Unbelievably Delicious: The apples turn tender and juicy, while the topping gets perfectly golden and slightly crisp. It’s comfort food in its purest form.
What makes this apple cobbler recipe different from the rest? For starters, I use a special trick—tossing the apples with both brown sugar and a splash of lemon juice—which gives them an extra depth of flavor and keeps them from turning mushy. The topping isn’t just flour and butter; it gets a lift from baking powder and a touch of vanilla, making it more like a soft, biscuit-y crust than a dense cake. If you’ve tried other cobblers and found them too bland or too soggy, this one’s going to be a revelation.
This recipe is more than just a dessert; it’s a hug in a bowl. Every bite takes me back to chilly evenings, kitchen laughter, and the simple joy of homemade treats. If you’re searching for that one fall dessert that everyone will beg for, you’ve found it. Trust me, you’ll want to make this apple cobbler again and again!
Ingredients Needed
This apple cobbler recipe uses basic, wholesome ingredients to deliver comforting flavors and a dreamy texture. Most of these are pantry staples, and you can swap or tweak as needed—it’s forgiving and flexible!
- For the Apple Filling:
- 6–7 medium apples (about 2.5 lbs / 1.1 kg), peeled, cored, and sliced (I like Granny Smith for tartness, but Honeycrisp and Gala work too)
- 1/2 cup (100 g) brown sugar (adds depth and caramel flavor)
- 1/4 cup (50 g) granulated sugar
- 1 tsp ground cinnamon
- 1/4 tsp ground nutmeg (optional, for warmth)
- 2 tbsp (28 g) unsalted butter, melted
- 1 tbsp (15 ml) lemon juice (keeps apples bright and prevents browning)
- 1 tbsp (8 g) cornstarch (thickens juices, so you don’t get a soupy cobbler)
- Pinch salt
- For the Cobbler Topping:
- 1 cup (120 g) all-purpose flour (use gluten-free blend if needed)
- 1/3 cup (67 g) granulated sugar
- 1 tsp baking powder
- 1/2 tsp salt
- 1/2 cup (115 g) unsalted butter, melted and cooled slightly
- 1/3 cup (80 ml) milk (whole milk or dairy-free alternative)
- 1 tsp vanilla extract
- Optional Topping:
- 2 tbsp (25 g) coarse sugar (for sprinkling, adds crunch)
- Vanilla ice cream or whipped cream, for serving
Ingredient notes: For the apples, I always recommend firm varieties—they hold up well and don’t turn to applesauce. If you want a less sweet cobbler, you can reduce the sugar by a couple tablespoons. For a gluten-free version, swap in your favorite 1:1 GF flour blend. I’ve also tried coconut milk for the topping and it works great! The cornstarch is key for thickening that gorgeous apple filling, so don’t skip it. And if you’re out of vanilla, a pinch of cinnamon in the topping is a nice twist.
Brands I love: King Arthur flour is my go-to, and Kerrygold butter gives the best richness. For apples, your local orchard is always a win—fresh, crisp, and full of flavor. If you want to get creative, toss in a handful of cranberries or a splash of maple syrup with the apples for a fun seasonal riff.
Equipment Needed
- 9×13-inch (23×33 cm) baking dish (ceramic or glass works best; metal tends to brown the edges more quickly)
- Large mixing bowl (for tossing apples and mixing topping)
- Whisk (for blending topping ingredients)
- Peeler and corer (makes prepping apples way faster—though a small paring knife works fine)
- Measuring cups and spoons (accuracy matters for cobbler texture!)
- Silicone spatula or spoon (for mixing and spreading)
- Oven mitts (trust me, this dish gets HOT)
If you’re not set on a 9×13-inch dish, you can use a deep 8×8-inch (20×20 cm) pan—just keep an eye on baking time. I’ve made cobbler in a cast iron skillet once, and honestly, it got extra crispy edges (yum!). If you don’t have a corer, just slice the apples thin and pick out the seeds as you go. Maintenance tip: If you use glass bakeware, let it cool before washing to prevent cracking. For budget-friendly options, Pyrex and Anchor Hocking dishes have never let me down.
Preparation Method
- Preheat the oven: Set your oven to 375°F (190°C). Grease your baking dish lightly with butter or nonstick spray.
- Prepare the apples: Peel, core, and slice your apples into even pieces (about 1/4-inch thick). You’ll want 6–7 medium apples—enough to fill your dish generously. If you like a chunkier filling, cut the apples a bit larger.
- Toss the apple filling: In a large bowl, combine the sliced apples, brown sugar, granulated sugar, cinnamon, nutmeg, melted butter, lemon juice, cornstarch, and a pinch of salt. Mix until all the apples are coated. Tip: If your apples seem dry, add a tablespoon of water.
- Layer the apples: Pour the coated apples into your prepared baking dish. Spread them out evenly—don’t worry if it looks a bit crowded, as they’ll cook down.
- Make the cobbler topping: In a separate bowl, whisk together the flour, sugar, baking powder, and salt. Pour in the melted butter, milk, and vanilla extract. Stir until just combined; the batter will be thick and slightly sticky. Don’t overmix—it’s fine if a few lumps remain.
- Top the apples: Spoon the topping over the apples in dollops. It won’t cover the filling completely, but that’s the beauty of cobbler—the juices bubble up around the edges and create those irresistible crispy bits. Smooth gently with a spatula if you want more even coverage.
- Add crunch (optional): Sprinkle coarse sugar over the topping for a sweet crunch once baked. You can also add a dash of cinnamon to the top if you love extra spice.
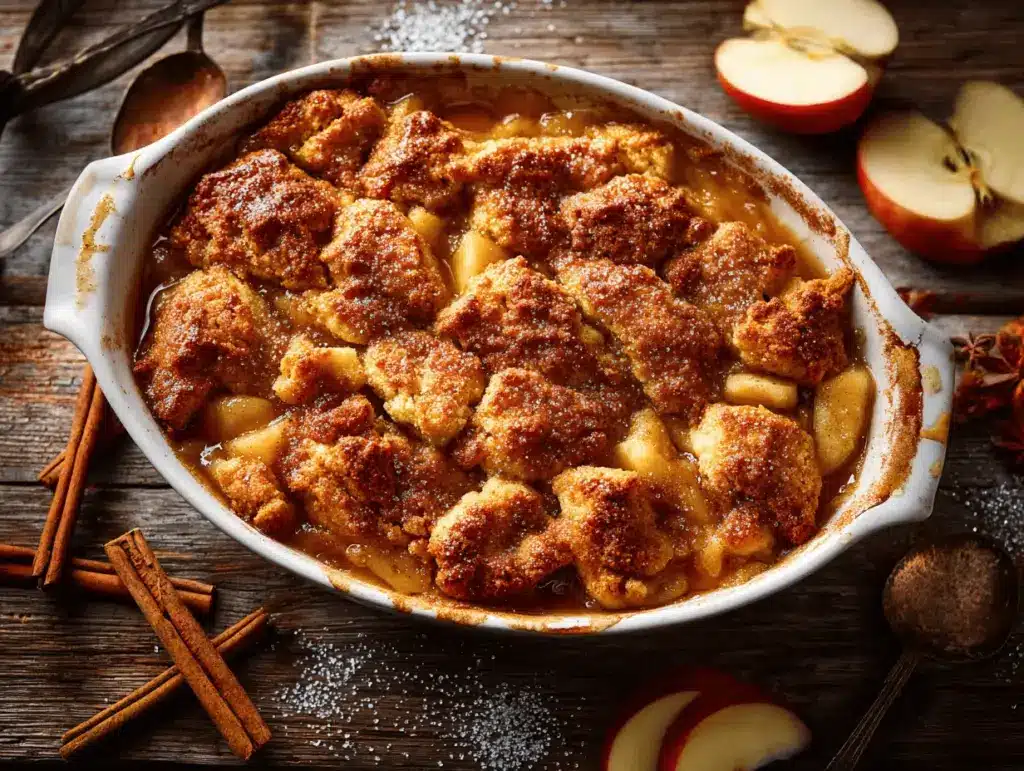
- Bake: Place your dish in the oven and bake for 40–45 minutes, until the topping is golden brown and the apples are bubbling. If the topping browns too fast, cover loosely with foil for the last 10 minutes.
- Check for doneness: The cobbler is ready when the topping is set and springy to the touch, and you see thick, syrupy juices bubbling up. The apples should be fork-tender—not mushy.
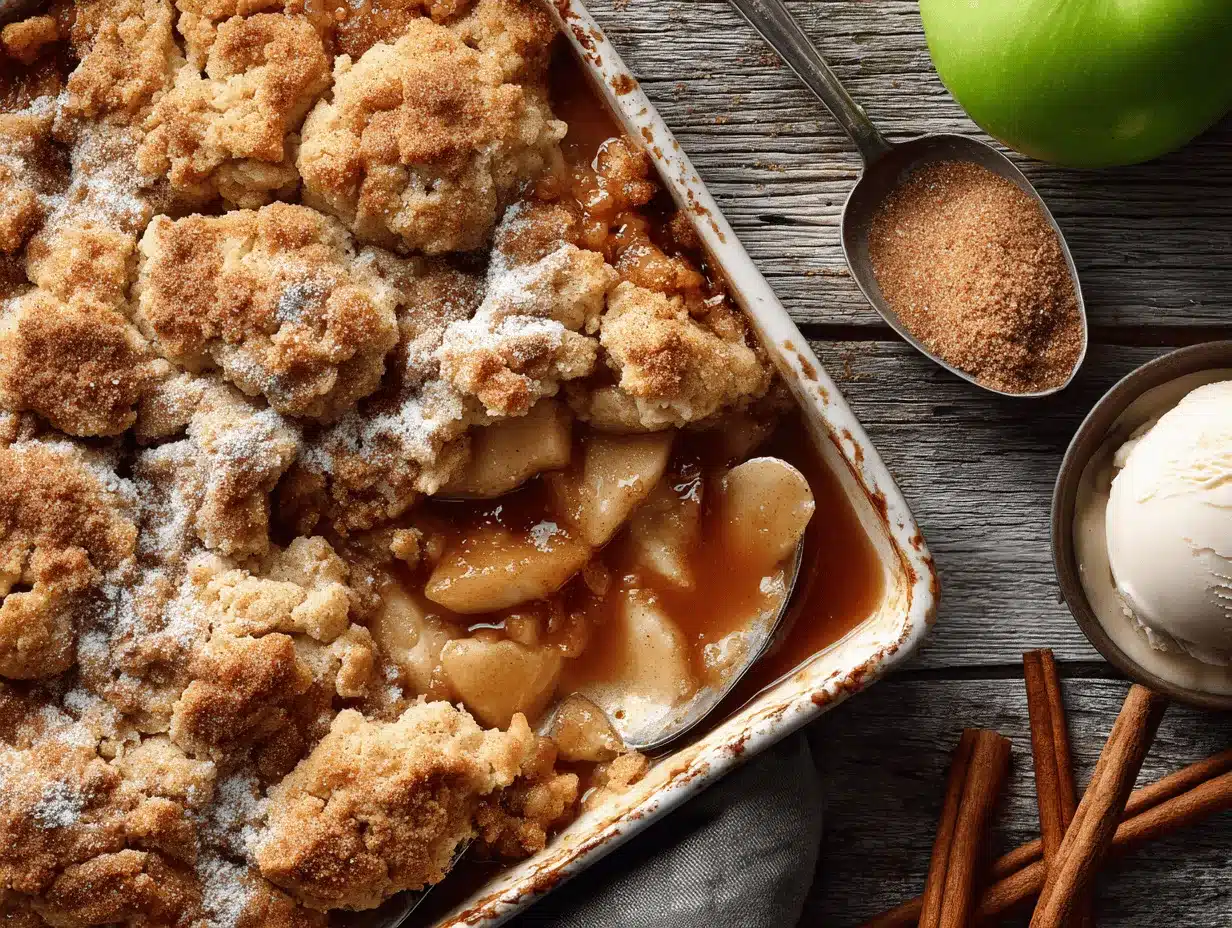
- Cool and serve: Let the cobbler cool for at least 10–15 minutes before serving (it’ll be piping hot!). Scoop generous portions into bowls and top with vanilla ice cream or whipped cream.
Troubleshooting tip: If your cobbler seems too runny, let it cool a bit longer—those juices will thicken as it sits. If the topping is dry, brush with a little melted butter right after baking. Personal trick: I always check the apples at the 30-minute mark and poke a few with a fork to test softness. The smell alone will let you know it’s almost ready!
Cooking Tips & Techniques
Years of baking apple cobbler have taught me a few tricks I swear by. First, always use apples that hold their shape—Granny Smith and Honeycrisp never get mushy. If you use all soft apples, you’ll end up with more of an applesauce base (been there, not as good!).
Don’t skimp on the lemon juice. It brightens the filling and prevents it from tasting flat. Mixing the cornstarch with the apples before baking is key—otherwise, the juices won’t thicken and you’ll have a soupy mess.
I’ve learned (the hard way) that overmixing the topping makes it tough. Just stir until barely combined, and don’t worry about a few lumps. If you want extra crispiness, use cold butter instead of melted—but honestly, melted makes it easier and just as delicious.
Timing matters! Start prepping the apples while your oven heats up, and mix the topping once the apples are in the dish. That way, you’re never waiting around. Multitasking tip: Clean up as you go to keep your kitchen calm and organized.
Consistency tip: Always measure your ingredients—eyeballing flour can lead to a dry or doughy topping. For a more golden crust, sprinkle sugar or brush with extra butter before baking. And if you’re making cobbler ahead, reheat it gently in the oven to keep the topping crisp (microwaves make it soggy).
Variations & Adaptations
One of the reasons I love this apple cobbler recipe is how flexible it is. Here are a few favorite twists you can try:
- Gluten-Free: Swap the all-purpose flour for a 1:1 gluten-free blend. I’ve used Bob’s Red Mill with great results—the texture is still lovely and crumbly.
- Vegan: Use coconut oil or vegan butter, and plant-based milk (like oat or almond) in the topping. Skip the whipped cream or opt for coconut whip on top.
- Spiced Autumn Cobbler: Add 1/4 teaspoon ground ginger or cardamom to the apple filling for extra warmth. For a holiday twist, toss in a handful of dried cranberries or chopped pecans.
- Berry Cobbler: Mix in 1 cup (150 g) fresh or frozen berries with the apples for a sweet-tart filling. Blueberries and apples are a dream combo.
- Low-Sugar: Use half the sugar in both filling and topping, or try coconut sugar for a deeper flavor.
- Cooking Methods: You can make this cobbler in a cast iron skillet for a rustic look, or divide into ramekins for individual servings. Adjust bake time as needed (smaller dishes bake faster).
Personal favorite: I once added a splash of bourbon to the apples, and wow—it brought out the caramel notes and was a hit with adults! If you need to avoid nuts, just skip any add-ins. For dairy allergies, go with your favorite plant-based milk and vegan butter.
Don’t be afraid to experiment—cobbler is forgiving, and you’ll discover your own signature twist in no time.
Serving & Storage Suggestions
Apple cobbler is best served warm, straight from the oven. That gooey, bubbling filling and toasty topping are hard to beat! I love to scoop it into shallow bowls and top with a big spoonful of vanilla ice cream—trust me, the melty creaminess is out of this world. Whipped cream or even a drizzle of caramel sauce makes it extra special.
For presentation, sprinkle a little cinnamon or coarse sugar over the cobbler before serving. Fresh mint leaves or thin apple slices on the side add a Pinterest-worthy look. If you’re serving a crowd, pair with coffee, chai tea, or apple cider for the ultimate fall treat.
Storage is easy: cover leftovers tightly and keep in the refrigerator up to 4 days. The flavors deepen overnight, so the next day’s cobbler is even better. To freeze, wrap the dish well and store for up to 2 months—thaw in the fridge and reheat in the oven at 350°F (175°C) for 15–20 minutes. If microwaving, do so in short bursts to avoid soggy topping. Honestly, I’ve enjoyed cold cobbler straight from the fridge more than once—it’s just that good!
Nutritional Information & Benefits
Each serving of this apple cobbler (about 1/8 of the pan) has roughly 260 calories, 6g fat, 45g carbs, and 2g protein. It’s not exactly diet food, but it does deliver some healthy goodness from the apples, which are packed with fiber, vitamin C, and antioxidants.
Using less sugar, swapping in whole wheat flour, or adding nuts can give the recipe a nutritional boost. If you’re following a gluten-free diet, use a certified GF flour blend. For low-carb needs, cut the sugar and use almond flour—though the texture will be a bit different.
Possible allergens include dairy (butter and milk) and gluten (flour). If you have sensitivities, swap to plant-based options. For me, apple cobbler is about balance—indulging in something sweet, but knowing it’s made with real fruit and simple ingredients. It’s comfort food that doesn’t feel too heavy, especially when shared with loved ones.
Conclusion
If you’re hunting for that perfect fall dessert—easy, cozy, and totally irresistible—this apple cobbler recipe is a must-try. It’s a simple homemade treat that delivers all the classic autumn flavors with minimal fuss. Whether you’re baking for family, friends, or just yourself, cobbler brings everyone together around the table.
I honestly love how customizable it is—swap apples, play with spices, or adapt for dietary needs. Every batch feels a little unique, and that’s part of the fun. So go ahead, grab those apples and make your kitchen smell amazing!
If you bake this apple cobbler, let me know how it turns out. Drop a comment below with your favorite twist, or share a photo if you’re proud of your creation! Your feedback means the world, and I’m always excited to hear about new cobbler adventures. Happy baking and cozy eating!
FAQs
What kind of apples are best for apple cobbler?
I love Granny Smith for tartness and firmness, but Honeycrisp, Gala, or Fuji also work great. Mixing varieties adds more flavor!
Can I make apple cobbler ahead of time?
Absolutely! You can bake it a day in advance, then reheat in the oven before serving. The flavors get even better overnight.
How do I make this apple cobbler gluten-free?
Just use a 1:1 gluten-free flour blend in place of all-purpose flour. The texture stays nice and crumbly.
Can I freeze apple cobbler?
Yes, wrap it well and freeze for up to 2 months. Thaw in the fridge and reheat in the oven—good as new!
What toppings go well with apple cobbler?
Vanilla ice cream, whipped cream, and caramel sauce are all delicious. Sometimes I add a pinch of cinnamon or chopped nuts for crunch!
Pin This Recipe!

Apple Cobbler Recipe – Easy Homemade Fall Dessert for Baking
- Total Time: 1 hour
- Yield: 8 servings 1x
Description
This easy apple cobbler is a cozy fall dessert featuring tender apples tossed with brown sugar and cinnamon, topped with a buttery, biscuit-like crust. It’s simple to make, crowd-pleasing, and perfect for gatherings or weeknight treats.
Ingredients
- 6–7 medium apples (about 2.5 lbs), peeled, cored, and sliced (Granny Smith, Honeycrisp, or Gala recommended)
- 1/2 cup brown sugar
- 1/4 cup granulated sugar
- 1 tsp ground cinnamon
- 1/4 tsp ground nutmeg (optional)
- 2 tbsp unsalted butter, melted
- 1 tbsp lemon juice
- 1 tbsp cornstarch
- Pinch salt
- 1 cup all-purpose flour (or gluten-free blend)
- 1/3 cup granulated sugar
- 1 tsp baking powder
- 1/2 tsp salt
- 1/2 cup unsalted butter, melted and cooled slightly
- 1/3 cup milk (whole milk or dairy-free alternative)
- 1 tsp vanilla extract
- 2 tbsp coarse sugar (optional, for sprinkling)
- Vanilla ice cream or whipped cream, for serving (optional)
Instructions
- Preheat oven to 375°F (190°C). Lightly grease a 9×13-inch baking dish with butter or nonstick spray.
- Peel, core, and slice apples into 1/4-inch thick pieces.
- In a large bowl, toss apples with brown sugar, granulated sugar, cinnamon, nutmeg, melted butter, lemon juice, cornstarch, and a pinch of salt until well coated.
- Spread apple mixture evenly in the prepared baking dish.
- In a separate bowl, whisk together flour, sugar, baking powder, and salt.
- Add melted butter, milk, and vanilla extract to the dry ingredients. Stir until just combined; batter will be thick and slightly sticky.
- Spoon topping over apples in dollops. Smooth gently with a spatula if desired.
- Sprinkle coarse sugar over the topping for crunch (optional).
- Bake for 40–45 minutes, until topping is golden brown and apples are bubbling. If topping browns too quickly, cover loosely with foil for the last 10 minutes.
- Check for doneness: topping should be set and springy, apples fork-tender.
- Cool for 10–15 minutes before serving. Serve warm with vanilla ice cream or whipped cream if desired.
Notes
Use firm apples like Granny Smith or Honeycrisp for best texture. For gluten-free, substitute a 1:1 GF flour blend. For vegan, use plant-based milk and butter. Sprinkle coarse sugar on top for extra crunch. Let cobbler cool before serving to allow juices to thicken. Store leftovers in the fridge up to 4 days or freeze up to 2 months.
- Prep Time: 15 minutes
- Cook Time: 45 minutes
- Category: Dessert
- Cuisine: American
Nutrition
- Serving Size: 1/8 of the pan
- Calories: 260
- Sugar: 28
- Sodium: 220
- Fat: 6
- Saturated Fat: 3.5
- Carbohydrates: 45
- Fiber: 3
- Protein: 2
Keywords: apple cobbler, fall dessert, easy baking, comfort food, homemade cobbler, autumn recipe, fruit dessert, crowd-pleaser, gluten-free option, biscuit topping