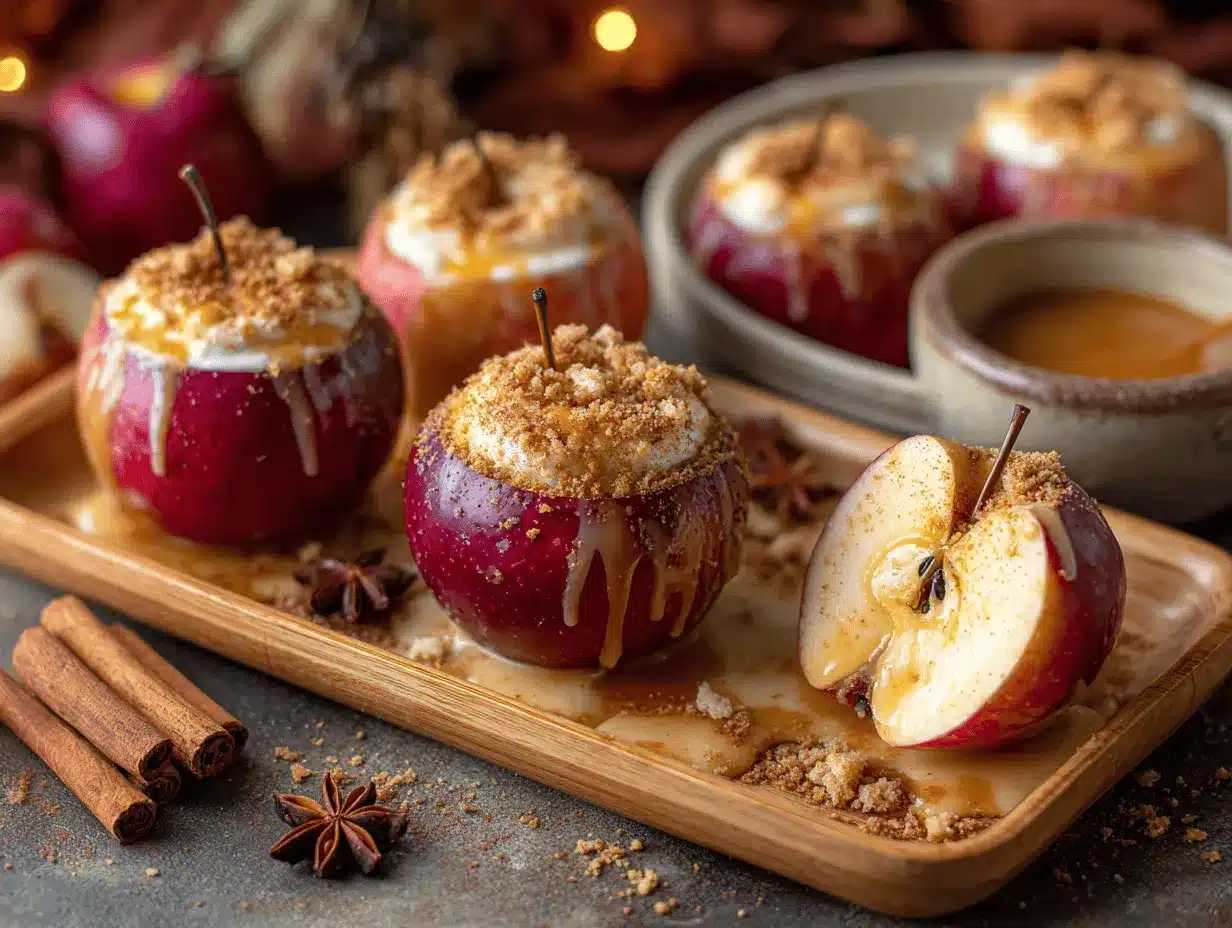
The first time I pulled a tray of cheesecake stuffed baked apples from my oven, the scent of cinnamon, vanilla, and caramelized apples filled my kitchen so completely, I almost forgot it was drizzling outside. Truly, there’s something magical about the way baked apples soften into sweet, juicy perfection, especially when you add a lusciously creamy cheesecake center. If you’re craving a dessert that’s as dreamy as it looks and tastes (seriously, Pinterest-worthy!), this is the recipe you’ll want to save, pin, and make on repeat all season.
Honestly, I stumbled onto this recipe one chilly October when I had apples galore from a local orchard and a block of cream cheese begging for attention. I’d always been a fan of classic baked apples, but stuffing them—that’s when the real fun started. The combination of tender fruit, tangy cream cheese, and a touch of spice? Absolute fall heaven. And you know what? My family polishes off the whole batch every time, no matter how many I make.
Cheesecake stuffed baked apples are my secret weapon for easy gatherings. They feel fancy enough for guests, but they’re simple and fuss-free—no water baths, no tricky crusts, just pure, comforting goodness. Plus, they’re naturally portion-controlled (which is handy, because self-restraint around these is tough). Whether you’re cooking for picky eaters, gluten-free friends, or just looking for a lighter twist on cheesecake, this recipe delivers. And if you love recipes that look as good as they taste, this one’s a showstopper for your fall table—or your Pinterest board. After baking these apples half a dozen times in every which way, I can honestly say: you need this cozy dessert in your life.
Why You’ll Love This Cheesecake Stuffed Baked Apples Recipe
- Quick & Easy: These cheesecake stuffed baked apples come together in under an hour, from coring to serving. Perfect for last-minute cravings or impromptu guests.
- Simple Ingredients: No complicated shopping lists—just apples, cream cheese, a handful of pantry staples, and some warm spices you probably already have.
- Perfect for Any Occasion: Whether it’s a cozy weeknight treat, a Thanksgiving dessert, or a fall brunch, these apples always fit right in.
- Crowd-Pleaser: I’ve served these to kids, adults, and even picky eaters—and not a single apple has ever survived the night!
- Unbelievably Delicious: The creamy cheesecake center against soft, juicy apple and a touch of brown sugar crunch? It’s the kind of flavor combo that makes you close your eyes and sigh in happiness.
What makes this version stand out? For starters, I blend the cheesecake filling until it’s extra smooth and fluffy, which means you get that classic tangy bite without a dense texture. I’ve tested different apples (trust me, not all apples bake the same!), and nothing beats a firm, slightly tart variety for that perfect balance. The best part—no pie crust to fuss with, making these naturally gluten-free, and you can easily tweak the sweetness or spice to your liking.
It’s not just another apple dessert. These cheesecake stuffed baked apples feel special, but they’re really easy to make. They satisfy cheesecake cravings in a lighter, fruit-forward way. If you’re looking for a dessert that’s both comforting and impressive, you can stop the search right here.
Ingredients Needed for Cheesecake Stuffed Baked Apples
This recipe keeps things simple, using ingredients that work together for major flavor and just the right textures. Here’s what you’ll need:
- For the Apples:
- 4 large apples (Honeycrisp, Granny Smith, or Fuji work well—firm and tart is best for baking)
- 1 tablespoon lemon juice (prevents browning and adds brightness)
- For the Cheesecake Filling:
- 8 ounces (225 g) cream cheese, softened (full-fat for richness, or use light for a lighter version)
- 1/4 cup (60 g) granulated sugar (or coconut sugar for a caramel note)
- 1 large egg, room temperature
- 1 teaspoon vanilla extract (pure vanilla is best, but imitation works in a pinch)
- 1/2 teaspoon ground cinnamon
- Pinch of salt
- For the Topping:
- 2 tablespoons brown sugar (adds a caramelized, crunchy finish)
- 1/4 cup (25 g) old-fashioned oats (optional, for a crisp topping)
- 1 tablespoon cold unsalted butter, cut into small cubes
- Chopped nuts—pecans or walnuts (about 2 tablespoons, optional for crunch)
Ingredient Tips: For the apples, I always go for Honeycrisp if I can—they hold up well and have that sweet-tart bite. If you’re dairy-free, swap the cream cheese for a plant-based alternative (like Kite Hill). You can use coconut sugar instead of granulated for a subtle caramel flavor, and gluten-free oats if needed. For a nut-free version, simply skip the nuts. These are all ingredients you can find at any grocery store, and most are pantry staples if you bake often.
If you want to dress things up, try drizzling with a little caramel sauce or a spoonful of whipped cream when serving. Sometimes I even toss a few mini chocolate chips into the cheesecake filling—totally optional, but so good. Honestly, you can make this your own with whatever you have on hand!
Equipment Needed
- Apple corer or paring knife: Makes hollowing out the apples quick and easy. (If you don’t have an apple corer, a spoon and a steady hand work too!)
- Mixing bowls: At least two—one for the cheesecake filling and one for the topping.
- Hand mixer or stand mixer: For whipping the cream cheese filling until smooth. I used a hand mixer for years before upgrading, and it works just fine.
- Baking dish or casserole pan: Large enough to fit all your apples upright. A glass or ceramic dish is easiest for cleanup.
- Measuring cups and spoons: For accuracy—especially with the filling.
- Small spoon: For stuffing the apples neatly.
- Aluminum foil: Helps prevent over-browning while baking.
If you’re looking to save money, skip the fancy apple tools—just use a paring knife carefully. I’ve even used a melon baller in a pinch, which worked surprisingly well! Clean your mixer beaters right after using—cream cheese likes to cling, and it’s much easier to wash before it dries. If your baking dish is a bit small, bake the apples in batches or use a rimmed baking sheet lined with parchment for easy cleanup.
How to Make Cheesecake Stuffed Baked Apples
- Prep the Apples (10 minutes): Wash and dry 4 large apples. Slice off the top 1/2 inch (about 1.5 cm) of each apple and set aside the “lid.” Using an apple corer, paring knife, or spoon, carefully hollow out the core and some of the flesh, leaving about 1/2 inch (1.5 cm) wall around the edges and bottom. Don’t go all the way through or the filling will leak! Brush the inside of each apple with lemon juice to keep them from browning.
- Make the Cheesecake Filling (5 minutes): In a mixing bowl, beat together 8 ounces (225 g) softened cream cheese and 1/4 cup (60 g) sugar until smooth and creamy. Add 1 large egg, 1 teaspoon vanilla extract, 1/2 teaspoon cinnamon, and a pinch of salt. Beat until combined and fluffy, about 1 minute. The mixture should be silky, with no lumps.
- Stuff the Apples (5 minutes): Spoon the cheesecake filling into each hollowed apple, filling to just below the top. Don’t overfill—they’ll puff up a bit as they bake.
- Mix the Topping (3 minutes): In a small bowl, combine 2 tablespoons brown sugar, 1/4 cup (25 g) oats, 1 tablespoon cold butter (cubed), and 2 tablespoons chopped nuts (if using). Use your fingers or a fork to mix until crumbly. Sprinkle the topping evenly over the cheesecake filling in each apple.
- Bake (30-35 minutes): Arrange the stuffed apples upright in a baking dish. Add 2-3 tablespoons water to the bottom of the dish (keeps the apples moist). Cover loosely with foil and bake at 350°F (175°C) for 20 minutes. Remove foil and bake another 12-18 minutes, until the apples are soft but not collapsing and the cheesecake filling is just set. The tops will be golden and a bit puffy.
- Cool and Serve (10 minutes): Let the apples cool in the baking dish for at least 10 minutes. This helps the cheesecake settle and makes them easier to serve. For a pretty finish, dust with a sprinkle of cinnamon or a drizzle of caramel sauce.
Troubleshooting: If your apples tip over, wedge them with crumpled foil. Filling oozing out? You probably hollowed too deep—leave a good base next time. If the cheesecake seems runny, it just needs a bit more cooling time. Apples not soft? Go for a few more minutes, checking every 3-5 minutes so they don’t collapse.
Personal Tips: Prep the apples the night before and store in lemon water in the fridge—just fill and bake when ready. If you’re short on time, microwave the apples for 2-3 minutes before stuffing to jump-start the softening. And always, always taste a bit of the filling (chef’s treat) before stuffing. You’ll thank me later!
Cooking Tips & Techniques for Perfect Cheesecake Stuffed Baked Apples
After making these cheesecake stuffed baked apples too many times to count, I’ve learned a few tricks that make all the difference:
- Use the Right Apples: Firm, tart apples (like Granny Smith or Honeycrisp) hold their shape and balance the sweetness. Softer apples (like Red Delicious) tend to collapse or get mushy.
- Don’t Over-Hollow: Leave about 1/2 inch (1.5 cm) wall and a solid base. If you go too thin, the apples will leak or fall apart.
- Smooth Filling is Key: Make sure your cream cheese is fully softened before beating. Lumpy filling just isn’t as dreamy—take the extra minute to beat until fluffy.
- Watch the Bake Time: Apples go from perfect to overcooked quickly. Start checking at 30 minutes. You want them fork-tender but still holding shape, and the cheesecake should jiggle slightly but not be runny.
- Cool Before Serving: Letting the apples rest helps the filling set, so you get neat, creamy bites instead of a puddle.
- Personal Oops: Once, I used apples that were too small—ended up with overflowing filling and a mess in the pan. Now, I always check size before starting. Multitasking tip: prep the filling while the apples are being cored and brushed with lemon juice. It saves time and keeps apples from turning brown.
- For Consistency: Use a cookie scoop to portion the filling so every apple bakes evenly. If you want a crispier topping, broil for 1-2 minutes at the end (watch closely!).
These little tweaks make a big difference, and once you get the hang of it, you’ll be able to whip up cheesecake stuffed baked apples that look and taste bakery-worthy every single time.
Variations & Adaptations
One of the best things about cheesecake stuffed baked apples is how easy they are to customize. Here are some of my favorite twists and swaps:
- Dietary Variations:
- Dairy-Free: Substitute vegan cream cheese and a flax egg (1 tablespoon flaxseed meal + 2.5 tablespoons water, mixed and rested) for the filling. Use plant-based butter for the topping.
- Gluten-Free: Make sure your oats are certified gluten-free, or skip them altogether for a nutty crumble with just nuts and brown sugar.
- Nut-Free: Omit nuts in the topping and go for extra oats or a sprinkle of seeds for crunch.
- Seasonal Twists:
- Fall: Add a pinch of nutmeg or allspice to the filling, or stir in finely diced dried cranberries for a tart burst.
- Winter: Stuff with a chocolate swirl cheesecake filling and a sprinkle of crushed peppermint on top (perfect for the holidays!).
- Spring: Swap in pears for apples when they’re in season—delicate and delicious.
- Flavor Boosts:
- Mix mini chocolate chips or toffee bits into the cheesecake filling for a fun surprise.
- Drizzle with honey or maple syrup just before serving for extra sweetness.
- Top with granola instead of oats for a breakfast-y spin.
My favorite personal tweak? Swapping half the cream cheese for ricotta—makes the filling extra light and a bit tangier. The recipe is truly forgiving, so don’t be afraid to experiment with what you love or have on hand.
Serving & Storage Suggestions
Cheesecake stuffed baked apples are best enjoyed warm, fresh from the oven. The filling is creamy, the apple is just-soft, and the topping is crumbly and golden—honestly, it’s hard to wait! If you want to serve them extra special, top with a dollop of whipped cream or a scoop of vanilla ice cream. A drizzle of caramel or a dusting of cinnamon is never a bad idea either.
These apples pair beautifully with a hot cup of coffee, spiced tea, or even a glass of mulled cider. For a brunch spread, serve alongside cinnamon rolls or a savory frittata for a cozy, well-rounded meal.
Leftovers (if you’re lucky enough to have any) keep well covered in the fridge for up to 3 days. Reheat gently in the microwave (about 30-40 seconds per apple) or in a low oven (300°F/150°C) until warmed through. The flavors deepen as they sit, so they’re just as tasty the next day. For longer storage, you can freeze baked apples (wrap tightly and store up to a month), but the texture softens a bit after thawing—still delicious, just a little less firm.
Nutritional Information & Benefits
Each cheesecake stuffed baked apple is around 250-300 calories, with about 4 grams of protein, 10 grams of fat, and 38 grams of carbs (will vary with apple size, filling, and toppings). They’re naturally gluten-free (skip oats or use gluten-free), and you can make them lower in sugar by swapping in a sugar substitute or using less sugar in the filling.
Apples bring fiber, vitamin C, and antioxidants to the table, while cream cheese offers a little protein and calcium. If you add nuts, you’ll get healthy fats and a bit more protein. Allergens to note: dairy (cream cheese, butter) and nuts (in topping, optional). For a lighter dessert, use light cream cheese and less sugar. I love that these satisfy a sweet tooth with a serving of fruit, making them a more wholesome treat than most fall desserts.
As someone who tries to keep desserts balanced, this recipe feels like the perfect middle ground—indulgent but not heavy, cozy yet not over-the-top.
Conclusion
If you’re searching for the ultimate cozy fall dessert, these cheesecake stuffed baked apples are calling your name. They’re simple to make, packed with flavor, and gorgeous enough to wow any crowd. Whether you mix and match fillings, go classic or jazz them up with toppings, this recipe is as flexible as it is delicious.
I keep coming back to this recipe because it’s the kind of treat that makes everyone smile—and it brings back memories of family, holidays, and chilly nights spent baking together. I hope you’ll give these a try, tweak them to your taste, and make them part of your own fall traditions.
If you try these cheesecake stuffed baked apples, let me know in the comments—share your favorite tweaks, post a photo, or tag me on Pinterest! Here’s to warm kitchens, sweet apples, and desserts that feel like a hug.
FAQs
What apples work best for cheesecake stuffed baked apples?
Firm, tart varieties like Granny Smith, Honeycrisp, or Fuji hold their shape and balance the sweetness of the cheesecake filling. Avoid softer apples, which tend to get mushy when baked.
Can I make cheesecake stuffed baked apples ahead of time?
Yes! You can prep the apples and filling up to a day in advance. Store the cored apples in lemon water in the fridge, then fill and bake when ready. You can also bake them, refrigerate, and reheat gently before serving.
Are these gluten-free?
They’re naturally gluten-free if you skip the oats or use gluten-free oats in the topping. Always check labels if you have sensitivities.
How do I keep the apples from falling apart?
Leave about a 1/2-inch wall and a solid base when hollowing out the apples. Don’t overbake—check for tenderness after 30 minutes and adjust as needed.
What can I use instead of cream cheese?
Try dairy-free cream cheese for a vegan version, or swap in part ricotta cheese for a lighter, fluffier filling. Greek yogurt also works but will have a tangier flavor and softer texture.
Pin This Recipe!
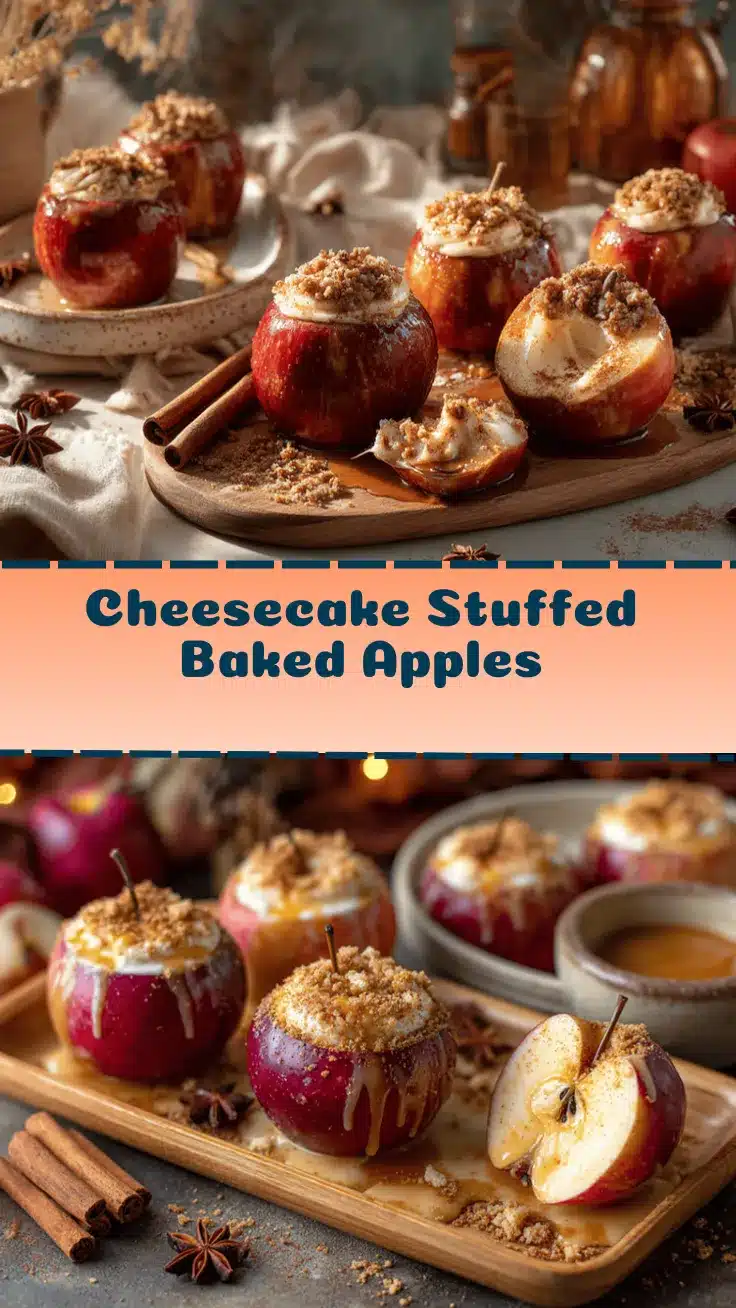

Cheesecake Stuffed Baked Apples
- Total Time: 52-58 minutes
- Yield: 4 servings 1x
Description
Tender baked apples filled with a creamy cheesecake center and topped with a crunchy oat and brown sugar crumble. This easy fall dessert is naturally gluten-free, crowd-pleasing, and perfect for cozy gatherings.
Ingredients
- 4 large apples (Honeycrisp, Granny Smith, or Fuji)
- 1 tablespoon lemon juice
- 8 ounces cream cheese, softened
- 1/4 cup granulated sugar (or coconut sugar)
- 1 large egg, room temperature
- 1 teaspoon vanilla extract
- 1/2 teaspoon ground cinnamon
- Pinch of salt
- 2 tablespoons brown sugar
- 1/4 cup old-fashioned oats (optional)
- 1 tablespoon cold unsalted butter, cut into small cubes
- 2 tablespoons chopped pecans or walnuts (optional)
Instructions
- Wash and dry apples. Slice off the top 1/2 inch of each apple and set aside. Hollow out the core and some flesh, leaving about 1/2 inch wall and base. Brush inside with lemon juice.
- In a mixing bowl, beat cream cheese and sugar until smooth. Add egg, vanilla, cinnamon, and salt. Beat until fluffy and combined.
- Spoon cheesecake filling into each apple, filling to just below the top.
- In a small bowl, mix brown sugar, oats, butter, and nuts (if using) until crumbly. Sprinkle topping over cheesecake filling.
- Arrange apples upright in a baking dish. Add 2-3 tablespoons water to the bottom. Cover loosely with foil and bake at 350°F for 20 minutes. Remove foil and bake another 12-18 minutes, until apples are soft and cheesecake is set.
- Let apples cool in the baking dish for at least 10 minutes before serving. Optionally, dust with cinnamon or drizzle with caramel sauce.
Notes
Use firm, tart apples for best results. For gluten-free, use certified gluten-free oats or omit. Prep apples ahead and store in lemon water. For a crispier topping, broil for 1-2 minutes at the end. Customize with nuts, chocolate chips, or caramel drizzle. Let apples cool before serving for best texture.
- Prep Time: 20 minutes
- Cook Time: 32-38 minutes
- Category: Dessert
- Cuisine: American
Nutrition
- Serving Size: 1 stuffed apple
- Calories: 250300
- Sugar: 28
- Sodium: 180
- Fat: 10
- Saturated Fat: 6
- Carbohydrates: 38
- Fiber: 5
- Protein: 4
Keywords: cheesecake stuffed apples, baked apples, fall dessert, gluten-free, easy apple dessert, cream cheese filling, autumn recipes