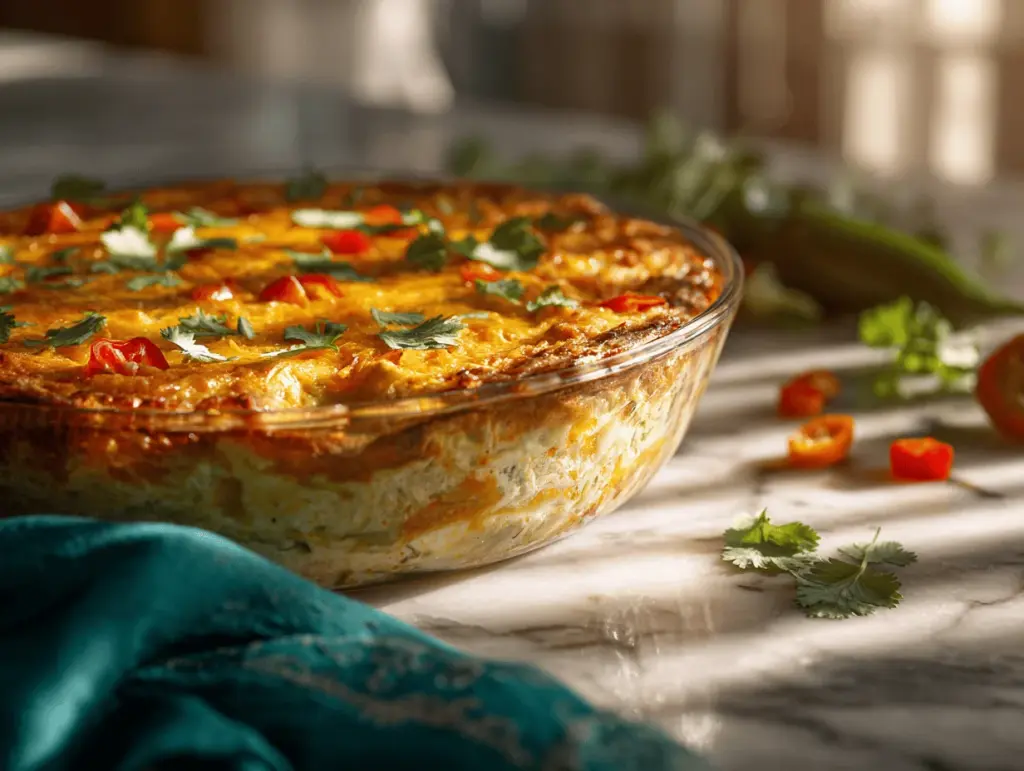
The first thing that hits you is the irresistible aroma – smoky Hatch chiles mingling with gooey cheese and a creamy egg custard, bubbling away in the oven. Honestly, for me, fall doesn’t truly start until I make this Creamy Cheese Hatch Chile Relleno Casserole. There’s something about those classic Southwestern flavors, cozied up in a casserole dish, that feels like a big warm hug. Maybe it’s nostalgia talking (my family used to drive hours for fresh Hatch chiles every September!), or maybe it’s just the ultimate comfort food magic.
This recipe came to life on a chilly October night, after a local farmer’s market haul left me with a bag bursting with fresh Hatch chiles. I wanted all the flavors of classic chile rellenos, but without the fuss of stuffing and frying each pepper – let’s face it, sometimes you need dinner to be easy and fuss-free. And that’s when the casserole version became my go-to for cozy gatherings and weeknight dinners alike.
Creamy Cheese Hatch Chile Relleno Casserole is a dream for anyone craving bold, roasted chile flavor with a cheesy, creamy twist. It’s got all the comfort of your grandma’s casseroles, but with a punch of Southwestern flair. Whether you’re a chile lover looking for a new way to use your stash, or just need a hearty dish that disappears fast at potlucks, this casserole is your ticket. I’ve tested it over a dozen times, playing with cheese blends, different chile heat levels, and even swapping in cottage cheese for extra creaminess (trust me, you won’t regret it). So grab those Hatch chiles, and let’s make fall taste even better!
Why You’ll Love This Recipe
- Quick & Easy: Comes together in under an hour, including bake time. Perfect for busy nights or when you want something impressive with minimal effort.
- Simple Ingredients: No need for fancy specialty items. Most ingredients are pantry staples or easily found at your local grocery store.
- Perfect for Fall Gatherings: Whether it’s Sunday supper, a cozy dinner with friends, or a holiday potluck, this casserole shines as a crowd-pleaser.
- Crowd-Pleaser: Even picky eaters go for seconds! The creamy cheese and mild heat win over both kids and adults.
- Unbelievably Delicious: The combo of smoky, roasted Hatch chiles and melty cheese is next-level comfort. It’s that dish that makes you close your eyes after the first bite—honestly, it’s addictive.
I’ve made a ton of chile relleno casseroles, but this Creamy Cheese Hatch Chile Relleno Casserole stands out for a few reasons. Blending cottage cheese into the custard base is my secret for extra creaminess without making it too heavy. I also roast the chiles myself (it’s easier than you think) for max flavor—you can taste the difference. The cheese blend is dialed in for both melt and flavor (think Monterey Jack, cheddar, and a hint of cream cheese for richness).
This isn’t just another casserole—it’s your new favorite. I’ve served it at family gatherings and watched it vanish before the rest of the meal. It’s the kind of recipe that makes you feel like a kitchen hero, but without any stress. If you love comfort food, fall flavors, and just a hint of spice, this is the recipe you need. It’s become a staple in my kitchen every autumn, and I bet it’ll earn a spot in yours too.
Ingredients Needed
This Creamy Cheese Hatch Chile Relleno Casserole keeps things simple, focusing on fresh, flavorful ingredients that deliver big on taste and texture. Most are easy to find—some you probably have already!
- For the Casserole Base:
- 6-8 large Hatch chiles, roasted, peeled, and seeded (about 340-400g) (adds smoky flavor; substitute Anaheim chiles if Hatch aren’t available)
- 2 cups shredded Monterey Jack cheese (200g) (melty and mild)
- 1 cup shredded sharp cheddar cheese (100g) (for a punch of flavor)
- 4 oz cream cheese, softened (115g) (extra creaminess)
- 1 cup cottage cheese (240g) (trust me—it gives the custard an unbeatable texture)
- 6 large eggs, room temperature
- 1 cup whole milk (240ml) (or use half-and-half for richer custard)
- 1/4 cup all-purpose flour (30g) (holds everything together; use gluten-free blend if needed)
- 1/2 tsp baking powder
- 1/2 tsp fine sea salt (adjust to taste; I use Redmond Real Salt for best flavor)
- 1/2 tsp freshly ground black pepper
- 1/2 tsp garlic powder (optional, for a little extra kick)
- 1/2 tsp onion powder (optional)
- For the Topping:
- 1/2 cup shredded cheddar or Monterey Jack cheese (50g) (for that bubbly golden finish)
- Chopped fresh cilantro or green onions, for garnish (optional)
Ingredient Notes & Substitutions:
- Hatch chiles: Seek out fresh Hatch chiles during late summer/early fall, or use canned, whole roasted chiles in a pinch. Anaheim or poblano chiles also work well.
- Cheese: Mix and match your favorite cheeses—try pepper jack for heat, or add a little crumbled queso fresco for authenticity.
- Cottage cheese: If dairy is an issue, swap with dairy-free cottage cheese or omit and increase cream cheese slightly (it will still be creamy!).
- Milk: Almond or oat milk works for a lighter version, but the richness of whole milk or half-and-half really shines.
- Flour: Any gluten-free blend works; almond flour is great for a grain-free option but will produce a slightly different texture.
Honestly, this recipe is forgiving—don’t stress if you’re missing one ingredient. Use what you love or have on hand!
Equipment Needed
- Large casserole dish (9×13-inch / 23x33cm works best; glass or ceramic preferred for even baking)
- Mixing bowls (one large, one medium for combining custard and cheese)
- Whisk (for smooth custard)
- Rubber spatula (handy for folding in cheese and scraping the bowl)
- Box grater (if shredding cheese yourself—freshly grated always melts better!)
- Small baking sheet (for roasting chiles, if doing at home)
- Aluminum foil (to help steam chiles after roasting and keep casserole from over-browning)
If you don’t have a 9×13 dish, two smaller dishes work fine—just watch the baking time. I’ve made this in a deep pie dish before, and it came out lovely (though a little thicker).
For roasting chiles, you can use a broiler, gas flame, or grill. If you’re short on time, canned roasted chiles do the trick! Maintenance-wise, keep your casserole dish free of stuck-on cheese by soaking it in hot water after use. Budget tip: Dollar store glass bakeware works surprisingly well—just avoid sudden temperature changes.
Preparation Method

- Roast and Prep the Hatch Chiles:
- Preheat your oven’s broiler to high (or set grill to medium-high).
- Arrange Hatch chiles on a baking sheet and roast, turning every 2-3 minutes, until skins are blistered and blackened (about 10 minutes total).
- Transfer roasted chiles to a bowl and cover with foil for 10 minutes—this steams the skins loose.
- Peel off the charred skins, remove stems and seeds, and set aside. (Wear gloves if you’re sensitive to chile oils!)
- Prepare the Cheese and Custard Mixture:
- In a large bowl, whisk together eggs, milk, cottage cheese, cream cheese, flour, baking powder, salt, pepper, garlic powder, and onion powder until smooth. (A little grainy from cottage cheese is normal.)
- Fold in the shredded cheeses, reserving 1/2 cup for topping.
- Layer the Casserole:
- Grease your casserole dish lightly with butter or nonstick spray.
- Spread half of the roasted Hatch chiles evenly in the bottom of the dish.
- Pour half the cheese-custard mixture over the chiles, spreading gently to cover.
- Repeat with remaining chiles and custard mixture.
- Sprinkle reserved cheese on top.
- Bake:
- Preheat oven to 350°F (175°C).
- Cover casserole loosely with foil and bake for 30 minutes.
- Remove foil and bake an additional 15-20 minutes, until top is golden and set, and a knife inserted in center comes out clean.
- If the top browns too quickly, tent with foil again.
- Cool and Serve:
- Let casserole rest for 10 minutes before serving—this helps it set up for clean slices.
- Garnish with chopped cilantro or green onions, if desired.
Troubleshooting Tips:
- If custard seems runny, bake an extra 5-10 minutes (every oven is a little different).
- If casserole is too spicy, serve with a dollop of sour cream or extra cheese—mellows things out.
- Chiles sticking to skin? Let them steam longer, and use paper towels to help peel.
Personal Tips: I always shred my cheese fresh for the best melt. Don’t rush the roasting step—it’s where the magic happens! And if you’re multitasking, prep the custard while chiles cool.
Cooking Tips & Techniques
Here’s where experience really helps! The secret to Creamy Cheese Hatch Chile Relleno Casserole is balancing moisture and flavor. I’ve learned the hard way that draining cottage cheese (just a bit) keeps the custard from getting watery. Also, roasting chiles until they’re deeply charred brings out their natural sweetness and cuts bitterness—don’t be shy with the broiler.
Common mistakes? Overbaking is a big one. If the casserole goes too long, it can get dry and rubbery. Start checking for doneness at 45 minutes, and use the knife test (it should come out mostly clean, but a little melted cheese is fine).
I’ve had my share of failures—once, I used low-fat cheese and the whole thing came out bland and watery. Full-fat is best for flavor and texture. If you’re short on time, use canned chiles, but rinse and pat dry to remove excess liquid.
Timing is everything. You can roast chiles a day ahead and keep them chilled until ready to use. If you want to multitask, prep your cheese and custard while chiles are cooling. For consistent results, always let the casserole rest before slicing—otherwise it’ll fall apart (and nobody wants a messy plate!).
If you’re making this for a crowd, double the recipe and use two dishes. And honestly, don’t stress about perfect layers—just make sure chiles are spread out and cheese is well-distributed for every bite.
Variations & Adaptations
This casserole is super flexible—here are some of my favorite twists!
- Low-Carb/Keto: Swap flour for almond flour and use full-fat dairy throughout. The texture will be a little more custardy, but still rich and satisfying.
- Vegetarian: It’s already meat-free, but toss in sautéed mushrooms, spinach, or roasted corn for extra veggies and flavor.
- Spicy Version: Use hot Hatch chiles or add diced jalapeños to the custard. Pepper Jack cheese is great for heat-lovers!
- Dairy-Free: Sub in vegan cream cheese, dairy-free cottage cheese, and plant-based shredded cheese blends. Almond milk works well for the custard base.
- Breakfast Adaptation: Add cooked chorizo or breakfast sausage between the chile layers. Serve with a side of hash browns or tortillas!
- Air Fryer Method: Bake in smaller, oven-safe dishes at 320°F (160°C) for 15-20 minutes—great for individual servings.
One time, I tried adding caramelized onions and roasted garlic for a deeper flavor—wow, it was a hit! Don’t be afraid to play with cheese blends or throw in a handful of fresh herbs. This recipe is all about making it your own.
Serving & Storage Suggestions
Creamy Cheese Hatch Chile Relleno Casserole is best served warm, straight from the oven. The cheese is melty, and the custard is perfectly set. I love slicing it into squares and stacking them high on a pretty platter—garnished with cilantro or green onions for color.
Pair it with:
- Mexican rice or black beans
- Fresh tomato salsa or pico de gallo
- A crisp green salad with lime vinaigrette
- Cold drinks—sparkling water, iced tea, or even a tangy margarita!
For storage, let the casserole cool completely. Cover tightly and refrigerate for up to 4 days. You can also freeze individual portions—wrap in foil and place in a freezer bag. To reheat, microwave slices for 1-2 minutes, or warm in the oven at 325°F (160°C) until heated through. Flavors deepen a bit after a day or two, making leftovers even tastier.
If you’re prepping ahead for a party, bake the casserole, cool, and store in the fridge. Reheat covered with foil to keep it moist. It’s perfect for make-ahead brunches or busy weeknights.
Nutritional Information & Benefits
Per serving (1/8th of a 9×13 casserole): approx. 270 calories, 16g protein, 18g fat, 10g carbs, 2g fiber. High in calcium and vitamin C, thanks to all that cheese and those Hatch chiles!
Key Health Benefits:
- Hatch chiles are loaded with antioxidants and vitamin C
- Cheese and eggs provide high-quality protein and calcium
- Cottage cheese offers extra protein with less fat than cream cheese alone
Gluten-free and low-carb adaptations make this casserole accessible for many diets. Allergen alert: contains dairy and eggs, plus wheat unless using a GF flour blend. I love that it fuels my family and tastes indulgent, without a heavy feeling after dinner.
Conclusion
Comfort food doesn’t get much better than this Creamy Cheese Hatch Chile Relleno Casserole. It’s the kind of dish that warms you up from the inside out and brings a little Southwestern sunshine to your table, even on the coldest fall days.
Try it as written, or make it your own with your favorite cheeses, veggies, or spice level. I keep coming back to this recipe because it’s easy, reliable, and always a hit—whether it’s a quiet family night or a bustling holiday party.
If you make this casserole, I’d love to hear how you customize it! Leave a comment below, share your photos, or tag me on Pinterest. Let’s spread the comfort food love this fall—one cheesy bite at a time!
Frequently Asked Questions
Can I use canned Hatch chiles instead of fresh?
Absolutely! Just drain and pat them dry before layering. Canned chiles save time and still deliver great flavor.
Is this casserole spicy?
It’s mild to medium, depending on the chiles used. For more heat, use hot Hatch chiles or add jalapeños. For less, mix in more cheese or serve with sour cream.
Can I prepare this ahead of time?
Yes! Assemble and refrigerate overnight, then bake fresh the next day. Or bake, cool, and reheat for easy meal prep.
What’s the best cheese for Hatch Chile Relleno Casserole?
Monterey Jack and cheddar are classic. Pepper Jack adds a kick, and cream cheese brings extra creaminess. Mix and match to suit your tastes!
How do I freeze leftovers?
Cool completely, wrap individual portions in foil, and store in a freezer bag. Reheat in the microwave or oven as needed. The texture holds up well!
Pin This Recipe!


Creamy Cheese Hatch Chile Relleno Casserole
- Total Time: 1 hour 5 minutes
- Yield: 8 servings 1x
Description
This easy casserole combines smoky roasted Hatch chiles, a blend of melty cheeses, and a creamy egg custard for the ultimate Southwestern comfort food. Perfect for fall gatherings, weeknight dinners, or potlucks, it’s a fuss-free twist on classic chile rellenos.
Ingredients
- 6–8 large Hatch chiles, roasted, peeled, and seeded (about 12–14 oz)
- 2 cups shredded Monterey Jack cheese
- 1 cup shredded sharp cheddar cheese
- 4 oz cream cheese, softened
- 1 cup cottage cheese
- 6 large eggs, room temperature
- 1 cup whole milk (or half-and-half)
- 1/4 cup all-purpose flour
- 1/2 tsp baking powder
- 1/2 tsp fine sea salt
- 1/2 tsp freshly ground black pepper
- 1/2 tsp garlic powder (optional)
- 1/2 tsp onion powder (optional)
- 1/2 cup shredded cheddar or Monterey Jack cheese (for topping)
- Chopped fresh cilantro or green onions, for garnish (optional)
Instructions
- Preheat your oven’s broiler to high (or set grill to medium-high).
- Arrange Hatch chiles on a baking sheet and roast, turning every 2-3 minutes, until skins are blistered and blackened (about 10 minutes total).
- Transfer roasted chiles to a bowl and cover with foil for 10 minutes to steam.
- Peel off the charred skins, remove stems and seeds, and set aside.
- In a large bowl, whisk together eggs, milk, cottage cheese, cream cheese, flour, baking powder, salt, pepper, garlic powder, and onion powder until smooth.
- Fold in the shredded cheeses, reserving 1/2 cup for topping.
- Grease a 9×13-inch casserole dish lightly with butter or nonstick spray.
- Spread half of the roasted Hatch chiles evenly in the bottom of the dish.
- Pour half the cheese-custard mixture over the chiles, spreading gently to cover.
- Repeat with remaining chiles and custard mixture.
- Sprinkle reserved cheese on top.
- Preheat oven to 350°F (175°C).
- Cover casserole loosely with foil and bake for 30 minutes.
- Remove foil and bake an additional 15-20 minutes, until top is golden and set, and a knife inserted in center comes out clean.
- Let casserole rest for 10 minutes before serving.
- Garnish with chopped cilantro or green onions, if desired.
Notes
For best flavor, roast chiles yourself and shred cheese fresh. Drain cottage cheese slightly to avoid watery custard. Use gluten-free flour for GF adaptation. Let casserole rest before slicing for clean servings. Can be made ahead and reheated. Substitute Anaheim or poblano chiles if Hatch are unavailable.
- Prep Time: 20 minutes
- Cook Time: 45 minutes
- Category: Main Course
- Cuisine: Southwestern
Nutrition
- Serving Size: 1/8th of casserole
- Calories: 270
- Sugar: 3
- Sodium: 550
- Fat: 18
- Saturated Fat: 10
- Carbohydrates: 10
- Fiber: 2
- Protein: 16
Keywords: hatch chile casserole, chile relleno casserole, comfort food, fall recipes, southwestern casserole, easy dinner, cheesy casserole, gluten-free option, vegetarian, make ahead